Drony Configuration(Android) For Iitg

Edit 17/08 UPDATE - Use Psiphon instead.. it is a better alternative to Drony for internet behind proxy. A guide to the same can be found here.

Configuring Drony for IITG WIFI: (For Android Only)


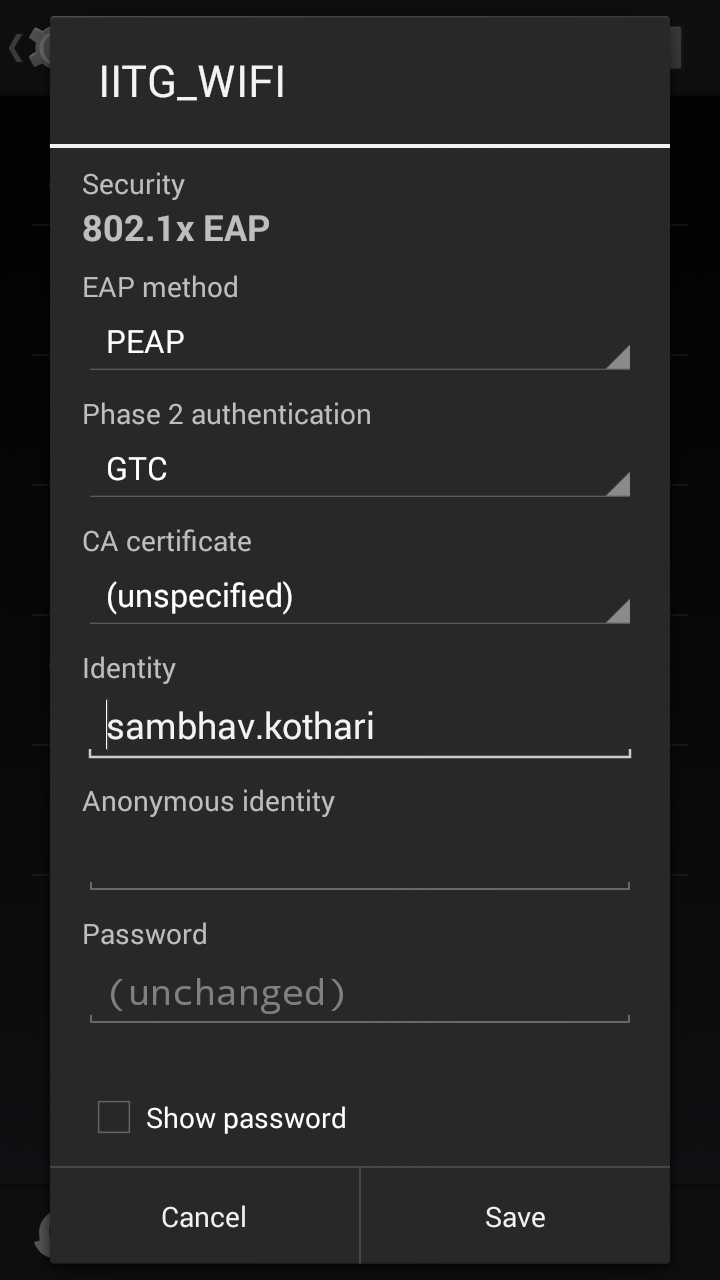
1. Configure the IITG WiFi network using the following Settings-

EAP method- PEAP
Phase 2 Authentication- GTC
CA certificate- (unspecified)
Identity- (Your webmail User id)
Password- (Your webmail password)


2. Click on 'Show advanced options'

3. Select 'Manual' for Proxy

4. Enter 'localhost' as proxy hostname and 8020 as proxy port.

5. Leave IP settings to DHCP.


6. Install Drony from the Play Store.

7. Go to the Settings tab for Drony.

8. Set the port to 8020.
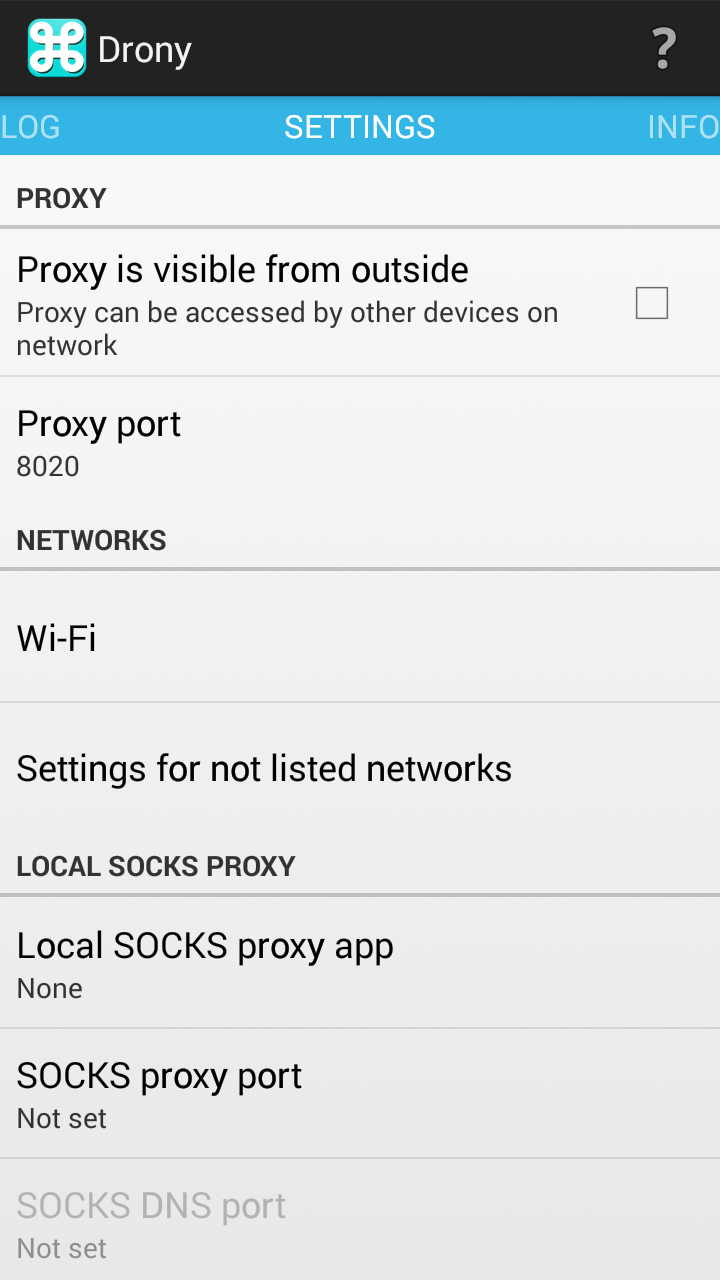


 9. Go to Wi-Fi.

10. Select the option that says 'IITG_WIFI'

11. You will reach the screen as shown below.

12. Select Proxy Type as Manual.

13. Change Host name to the proxy server provided to you by the CC. It will be something along the lines of 202.141.XX.XX.

14. Change the port to 3128.

15. Change the Username and Password to your web-mail id and proxy password.


16. Go back to the main screen and start Drony by clicking 'ON'.


17. Congrats, you have now successfully configured Drony and can now use all your apps on the IITG WiFi network.

If you have some questions, leave a comment below.


Setting Up Your Iitg Email Account On Android

1. Open your Gmail app.
2. Open the left drawer by sliding it.
3. Click on 'Add account'.

4. Select 'Personal (IMAP/POP).


5. Type your webmail id.

6. In the type of account screen, select Personal (POP3).

7. In the next screen type your webmail password.

8. In the incoming sever settings type your username (without @iitg.ernet.in) , password.

9. Set your server address according to the mail server provided to you.
List of server addresses-
  •  Teesta 202.141.80.12
  •  Naambor 202.141.80.9
  •  Disang 202.141.80.10
  • Tamdil 202.141.80.11
  •  Dikrong 202.141.80.13


10. Set the Security type to SSL/TLS (Accept all cerificates).
11. Change the port to 995.

12. Set the outgoing SMTP server address to 202.141.80,23 (it's the CC's address but since outgoing smtp server settings don't seem to work, I had to go with a this to complete the email setup. If anyone gets the Outgoing server settings working, let me know!)
13. Set the security type to 'None'.
14. Set the port to 25.

15.Next setup your sync frequency and notification settings accordingly.
16. Done!! enjoy checking your webmail without having to enter that fricking captcha ever again.

 P.S. This only works on IIT networks (either your own personal Wi-Fi, connectify or IITG wifi/Hostel Wifi, not on cellular data).


Psiphon Settings For Proxy


I have been searching for a good drony alternative for Lollipop for quite some time now.

Psiphon seems to be the best yet.

You can download it from here.

1. Go to your Wi-Fi settings and change the Proxy settings to None.

2. Open Psiphon and go to option and select the settings as given below. Go to More Options and configure it as follows.


3. In the More Options screen , configure Psiphon as shown below.
Replace 202.141.80.22 with the server address you use for your proxy authentication.
Port will be 3128.Username and PWD will the proxy username and passwords you use normally.


4. Start Psiphon and let it run. I found almost everything to be working (Chrome , Play store, whatsapp , Messenger, Facebook).
This is the best alternative to Drony I have found yet. If you know of something more seamless let me know.


Squid For Ubuntu, Because Proxies Are Too Much Of A Hassle

EDIT : Added Authentication methods for dynamic ips


It has been more than a year since I have been using squid to mitigate all the proxy problems that come due to the proxy authentication.

This is the most effective and hassle free way to set proxy in Linux.

Steps:

Note : Replace 'squid' with 'squid3' if you are not using Ubuntu 16.04

1. Install squid

sudo apt-get install squid

2. Edit the squid configuration file.

sudo vim /etc/squid/squid.conf

(for Ubuntu 15.10 and older)

sudo vim /etc/squid3/squid.conf

3. Delete all the contents of that file and replace them with the configuration given below:


Replace 10.0.2.21 with your own ip address/ other ip addresses that you want to access this proxy from.

Change 202.141.80.22 with your Proxy server address.

Change username:password to your proxy username and password.

4. Save the file ( Esc and ":wq" for vim noobs)

5. Restart the squid server.

sudo service squid restart

(for Ubuntu 15.10 and older)

sudo service squid3 restart

6. Edit your Proxy Settings from the network manager.


7. Open your bash profile.

sudo vim /.bashrc

Append the following to the end of the file.

export http_proxy=http://127.0.0.1:3128
export https_proxy=http://127.0.0.1:3128


The above two things should effectively resolve all proxy problems ( Environment Variables inclusive. )

8. Source the bashrc

source /.bashrc

And with that you are done!

You have your own personal proxy server!

Say goodbye to proxy problems.


PS - For those of you on the more geeky side of things, what we have done with the above is create our own proxy server that caches another proxy server with authentication.

The proxy server we have made is effectively a non authentication proxy server for the ips in the allowed_ips acl.

If used a bit cleverly it might also help you get around some other big-'time' restrictions ;) .

Use wisely!


Squid with username password authentication

Follow the steps as above.

Afterwords, do the following:

1. Install apache2-utils
sudo apt-get install apache2-utils

2. Make the password file

Replace squid3 with squid if Ubuntu 16.04

sudo touch /etc/squid3/passwd

sudo chmod 755 /etc/squid3/passwd

3. Create a username/password pair


sudo htpasswd /etc/squid3/passwd user1

4. Change the squid.conf file as follows:
5. Restart squid.

sudo service squid3 restart

Drony Configuration(Android) For Iitg

Edit 17/08 UPDATE - Use Psiphon instead.. it is a better alternative to Drony for internet behind proxy. A guide to the same can be found here.

Configuring Drony for IITG WIFI: (For Android Only)


1. Configure the IITG WiFi network using the following Settings-

EAP method- PEAP
Phase 2 Authentication- GTC
CA certificate- (unspecified)
Identity- (Your webmail User id)
Password- (Your webmail password)


2. Click on 'Show advanced options'

3. Select 'Manual' for Proxy

4. Enter 'localhost' as proxy hostname and 8020 as proxy port.

5. Leave IP settings to DHCP.


6. Install Drony from the Play Store.

7. Go to the Settings tab for Drony.

8. Set the port to 8020.


 9. Go to Wi-Fi.

10. Select the option that says 'IITG_WIFI'

11. You will reach the screen as shown below.

12. Select Proxy Type as Manual.

13. Change Host name to the proxy server provided to you by the CC. It will be something along the lines of 202.141.XX.XX.

14. Change the port to 3128.

15. Change the Username and Password to your web-mail id and proxy password.


16. Go back to the main screen and start Drony by clicking 'ON'.


17. Congrats, you have now successfully configured Drony and can now use all your apps on the IITG WiFi network.

If you have some questions, leave a comment below.


Setting Up Your Iitg Email Account On Android

1. Open your Gmail app.
2. Open the left drawer by sliding it.
3. Click on 'Add account'.

4. Select 'Personal (IMAP/POP).


5. Type your webmail id.

6. In the type of account screen, select Personal (POP3).

7. In the next screen type your webmail password.

8. In the incoming sever settings type your username (without @iitg.ernet.in) , password.

9. Set your server address according to the mail server provided to you.
List of server addresses-
  •  Teesta 202.141.80.12
  •  Naambor 202.141.80.9
  •  Disang 202.141.80.10
  • Tamdil 202.141.80.11
  •  Dikrong 202.141.80.13


10. Set the Security type to SSL/TLS (Accept all cerificates).
11. Change the port to 995.

12. Set the outgoing SMTP server address to 202.141.80,23 (it's the CC's address but since outgoing smtp server settings don't seem to work, I had to go with a this to complete the email setup. If anyone gets the Outgoing server settings working, let me know!)
13. Set the security type to 'None'.
14. Set the port to 25.

15.Next setup your sync frequency and notification settings accordingly.
16. Done!! enjoy checking your webmail without having to enter that fricking captcha ever again.

 P.S. This only works on IIT networks (either your own personal Wi-Fi, connectify or IITG wifi/Hostel Wifi, not on cellular data).


Psiphon Settings For Proxy


I have been searching for a good drony alternative for Lollipop for quite some time now.

Psiphon seems to be the best yet.

You can download it from here.

1. Go to your Wi-Fi settings and change the Proxy settings to None.

2. Open Psiphon and go to option and select the settings as given below. Go to More Options and configure it as follows.


3. In the More Options screen , configure Psiphon as shown below.
Replace 202.141.80.22 with the server address you use for your proxy authentication.
Port will be 3128.Username and PWD will the proxy username and passwords you use normally.


4. Start Psiphon and let it run. I found almost everything to be working (Chrome , Play store, whatsapp , Messenger, Facebook).
This is the best alternative to Drony I have found yet. If you know of something more seamless let me know.


Squid For Ubuntu, Because Proxies Are Too Much Of A Hassle

EDIT : Added Authentication methods for dynamic ips


It has been more than a year since I have been using squid to mitigate all the proxy problems that come due to the proxy authentication.

This is the most effective and hassle free way to set proxy in Linux.

Steps:

Note : Replace 'squid' with 'squid3' if you are not using Ubuntu 16.04

1. Install squid

sudo apt-get install squid

2. Edit the squid configuration file.

sudo vim /etc/squid/squid.conf

(for Ubuntu 15.10 and older)

sudo vim /etc/squid3/squid.conf

3. Delete all the contents of that file and replace them with the configuration given below:


Replace 10.0.2.21 with your own ip address/ other ip addresses that you want to access this proxy from.

Change 202.141.80.22 with your Proxy server address.

Change username:password to your proxy username and password.

4. Save the file ( Esc and ":wq" for vim noobs)

5. Restart the squid server.

sudo service squid restart

(for Ubuntu 15.10 and older)

sudo service squid3 restart

6. Edit your Proxy Settings from the network manager.


7. Open your bash profile.

sudo vim /.bashrc

Append the following to the end of the file.

export http_proxy=http://127.0.0.1:3128
export https_proxy=http://127.0.0.1:3128


The above two things should effectively resolve all proxy problems ( Environment Variables inclusive. )

8. Source the bashrc

source /.bashrc

And with that you are done!

You have your own personal proxy server!

Say goodbye to proxy problems.


PS - For those of you on the more geeky side of things, what we have done with the above is create our own proxy server that caches another proxy server with authentication.

The proxy server we have made is effectively a non authentication proxy server for the ips in the allowed_ips acl.

If used a bit cleverly it might also help you get around some other big-'time' restrictions ;) .

Use wisely!


Squid with username password authentication

Follow the steps as above.

Afterwords, do the following:

1. Install apache2-utils
sudo apt-get install apache2-utils

2. Make the password file

Replace squid3 with squid if Ubuntu 16.04

sudo touch /etc/squid3/passwd

sudo chmod 755 /etc/squid3/passwd

3. Create a username/password pair


sudo htpasswd /etc/squid3/passwd user1

4. Change the squid.conf file as follows:
5. Restart squid.

sudo service squid3 restart

Search

Blog Archive